If you want accuracy, consistency, and easier setup, you need the right dial indicator, the right magnetic base, and the right resolution.
You will see seven options that cover general machining, delicate alignment, and everyday inspection, from compact 0.001 inch models to sensitive 0.030 inch test indicators.
Each one solves a different shop problem, but the best choice depends on what you measure most often, and that is where things get interesting.


More Details on Our Top Picks
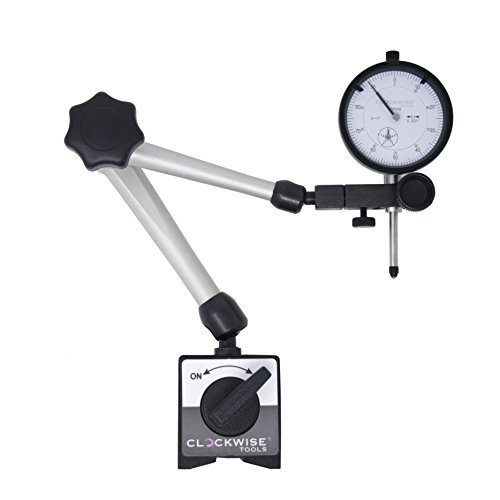
Clockwise Tools Dial Indicator with Magnetic Base Stand
If you need a dial indicator that delivers high precision, reliable readings for machining, automotive, or industrial work, the Clockwise Tools Dial Indicator with Magnetic Base Stand is a strong fit. It offers a 0 to 1 inch range and 0.001 resolution for accurate measurements. The flat back and lug back design improve compatibility, while the 6.5 mm lug hole and 3/8 stem add flexibility. Its twisto lock bezel lets you adjust the scale easily, and the anti dust cap helps protect it. Two strong magnetic faces deliver up to 176 lbs of pull on thicker metal.
- Measurement Range:0–1 in
- Resolution:0.001 in
- Magnetic Base:Included
- Dial Size:2 in
- Back Type:Flat/lug
- Contact Tip:Carbide ball
- Additional Feature:176 lb pull force
- Additional Feature:Twisto-lock bezel
- Additional Feature:Carbide anvil ball
Dial Indicator Magnetic Base Precision Inspection Set
The NAKAO TR72020 dial indicator magnetic base precision inspection set is a practical choice when you need a compact, accurate setup for detailed machine alignment and inspection work. It includes a 0 to 1 inch dial indicator with 0.001 inch graduations, a 2 inch face, and a 3/8 inch stem for precise readings. The 130 lb magnetic base, fine adjustment long arm, and on and off switch help you position it quickly and hold it steady. You also get a 22 piece AGD point set with 4-48 threads and a hard plastic case. It is built for consistent, repeatable inspection tasks.
- Measurement Range:0–1 in
- Resolution:0.001 in
- Magnetic Base:Included
- Dial Size:2 in
- Back Type:Lug back
- Contact Tip:Point set
- Additional Feature:22-piece point set
- Additional Feature:Fine-adjustment long arm
- Additional Feature:Hard plastic case
Fowler 52-520-109-0 Adg Dial Indicator With 0-1″ Measuring Range (Black)
Fowler’s 52-520-109-0 AGD dial indicator is a strong choice when you need precise 0.001″ readings in a durable 0 to 1″ range. Its black 2.25″ dial is easy to read, with microfine white graduations, a red hand, and a continuous 0 to 100 scale. The carbide ball contact, hardened stainless steel spindle, and forged brass body help it resist wear. You can set it with the 360° knurled bezel and tolerance markers, and the center lug back fits common setups. It meets AGD Group II specifications and comes from Fowler’s Massachusetts company, founded in 1946.
- Measurement Range:0–1 in
- Resolution:0.001 in
- Magnetic Base:Not included
- Dial Size:2.25 in
- Back Type:Center lug
- Contact Tip:Carbide ball
- Additional Feature:360° bezel adjustment
- Additional Feature:Hardened brass gears
- Additional Feature:1-year warranty
HGC Precision Yellow 0.030″ Test Indicator Dial Reading 0-15-0
With its 0-15-0 dial reading, 0.0005 accuracy, and 270 degree swiveling design, the HGC Precision Yellow 0.030″ Test Indicator is ideal for quick, reliable setup checks in machine work or general production. You will appreciate its brass body, satin chrome finish, and anti glare yellow face for fast readability in any position. The isolated pinion and non magnetic parts improve sensitivity and reduce interference. Three dovetail mounts, two direction action, and automatic contact reversal provide flexible alignment control. It is compact, durable, and ready for precise production work.
- Measurement Range:0.030 in
- Resolution:0.0005 in
- Magnetic Base:Not included
- Dial Size:1.25 in
- Back Type:Three dovetail
- Contact Tip:Ball tip
- Additional Feature:270° swiveling
- Additional Feature:Anti-glare yellow dial
- Additional Feature:Non-magnetic construction
WEN 10703 1 in. Precision Dial Indicator with .001 in. Resolution
WEN’s 10703 precision dial indicator is a smart choice when you need a compact, accurate tool for measuring runout or calibrating test equipment. It offers 0.001-inch resolution and 0.001-inch accuracy, helping keep readings precise. The stainless steel rack and contact tip support reliable performance, while the spring-loaded plunger retracts smoothly. You can rotate the bezel, set adjustable markers, and read the 2-inch face with ease. Mount it to a magnetic base using the 1/4-inch lug hole, and you get ASME and ANSI compliance plus a two-year warranty.
- Measurement Range:1 in
- Resolution:0.001 in
- Magnetic Base:Not included
- Dial Size:2 in
- Back Type:Lug hole
- Contact Tip:Stainless steel
- Additional Feature:ASME/ANSI compliant
- Additional Feature:Rotatable bezel
- Additional Feature:Two-year warranty
HFS Precision Travel Dial Indicator 0-2″ 0.001″ Graduation
The HFS Precision Travel Dial Indicator 0-2″ 0.001″ Graduation is a solid choice if you need accurate, easy to read measurements for lathe work. It offers a 2 inch range, 0.001 inch graduations, and a clear 0 to 100 dial with an anti glare aluminum face. Its jeweled bearing, revolution counter, and dial lock screw help you monitor movement with confidence. The aluminum body feels sturdy, and the AGD2 compliant design mounts easily through the 3/8 inch stem or 1/4 inch lug back holes. Expect +/-0.001 accuracy in the first 2.5 revolutions and +/-0.003 overall.
- Measurement Range:0–2 in
- Resolution:0.001 in
- Magnetic Base:Not included
- Dial Size:2.28 in
- Back Type:Lug back
- Contact Tip:Jeweled bearing
- Additional Feature:2.5-rev accuracy
- Additional Feature:Jeweled bearing
- Additional Feature:Dial lock screw
Neoteck Dial Indicator and Magnetic Base Set
Neoteck’s dial indicator and magnetic base set is a strong choice when you need a compact, accurate setup for shop or machine work. It pairs a 0-1″ indicator with 0.001″ precision and a magnetic base that locks firmly onto steel surfaces. You also get hardened stainless steel components, ASME/ANSI compliance, and a plastic case for storage. The 176 pound max pull helps hold position during alignment, while the adjustable arm adds reach and control. Use it for CNC machines, lathes, 3D printers, and woodworking whenever you need reliable error checking and setup accuracy.
- Measurement Range:0–1 in
- Resolution:0.001 in
- Magnetic Base:Included
- Dial Size:Not specified
- Back Type:Not specified
- Contact Tip:Hardened stainless steel
- Additional Feature:176 lb pull
- Additional Feature:Fine-tuning knob
- Additional Feature:Plastic storage case
Factors to Consider When Choosing Dial Indicators
When you choose a dial indicator, match the measurement range and resolution accuracy to your work. Check mounting compatibility and magnetic base strength so the tool stays secure and easy to position. Finally, choose a model with solid build durability if you need reliable performance over time.
Measurement Range
Choosing the right measurement range starts with the largest travel you need to check, so the indicator can move freely without bottoming out. If you mostly inspect runout or similar general precision tasks, a 0 to 1 inch dial indicator usually fits well. When you need extra movement for bigger part shifts, a 0 to 2 inch model gives you more room to work. For delicate setup and alignment jobs, a smaller 0.030 inch test indicator can handle tiny deviations. You should always match the range to the job, because forcing the plunger past its limit can harm the tool and skew your results. If you switch between small variations and larger offsets, a wider range can add flexibility, but a shorter range indicator often feels better for specialized, fine tuning work.
Resolution Accuracy
Resolution accuracy tells you how small a change your dial indicator can reliably show, and that matters whenever you are checking tiny runout, alignment, or setup errors. You will usually see high precision indicators read to 0.001 inch, while some test indicators reach 0.0005 inch for even finer sensitivity. Pick the resolution that matches your work. A resolution of 0.001 inch often suits general setup, but 0.0005 inch helps whenever you need to catch errors measured in only a few thousandths. Do not confuse resolution with accuracy. A dial can show tiny increments and still carry total error of about plus or minus 0.001 to plus or minus 0.003 inch. For repetitive inspection, choose a model with fine graduation and stable internal movement so your readings stay consistent across the full travel range.
Mounting Compatibility
Before you buy a dial indicator, make sure its mounting style matches the holder or base you plan to use. Check whether you need a flat back, a lug back, or a model that offers both, because the back type has to fit your setup. Then verify the lug hole or stem size. Common options include 6.5 mm lug holes, 1/4 inch lug holes, and 3/8 inch stem diameters. Also confirm the thread or attachment standard, such as 4-48 threads for indicator points or a 1/4 inch lug hole for magnetic base mounting. If you want easier alignment, look for a rotatable bezel, 360° positioning, or fine tuning arms. Finally, make sure your holder can support the indicator securely on your work surface.
Magnetic Base Strength
Magnetic base strength matters because it affects how securely your dial indicator stays in place during measurement. You should look at the base’s maximum pull force. Many models range from about 130 lb to 176 lb, and higher pull usually provides better stability for precise work. Check the surface too, because thicker ferrous metal lets the magnet reach full holding power, while thinner stock can weaken the grip and let the setup shift. Bases that need around 30 mm of metal thickness often hold best. When you work on heavy or vibration-prone setups, choose a stronger pull rating and a stable arm design. Two contact faces or an on and off switch can also help you position, lock, and remove the base more securely.
Build Durability
Once you’ve got the indicator held firmly in place, build durability becomes the next thing to check. You want hardened or carbide contact points and wear-resistant internal parts so the tool stays accurate after repeated use. A rigid metal body and a precise gear train help reduce flex, improve smooth action, and keep performance steady over time. Jeweled bearings, stainless steel racks, and brass or aluminum construction can add toughness without adding unnecessary bulk. Look for anti-dust caps, sealed mechanisms, and sturdy bezels so shop debris and daily handling do not shorten service life. Whenever you will mount or move the indicator often, choose a model with strong, stable construction that holds alignment under vibration and repeated repositioning.
Reading Visibility
How easily can you read the dial at a glance? Choose a dial indicator with a larger face, around 2 inches or more, so the numbers and graduations stand out quickly. You will also want high-contrast markings, such as white graduations on a black dial or black markings on a light face, because contrast helps you read faster in dim or busy spaces. A clear 0.001 inch graduation keeps the scale precise without crowding the display. To reduce glare, pick an anti-glare finish and a rotatable bezel so you can angle the dial for better visibility. A revolution hand or secondary pointer can make multi-turn movement easier to track, helping you stay focused on the reading instead of squinting.
Standards Compliance
Beyond readability, make sure the dial indicator matches recognized standards like AGD Group II, ASME, or ANSI. This gives you more consistent dimensions, better compatibility, and clearer measurement expectations when the tool follows a recognized spec. Check that the graduations and accuracy claims align with the standard, such as 0.001 inch resolution and stated limits like plus or minus 0.001 or plus or minus 0.0005. Confirm mounting details too, including stem diameter, lug back size, and thread style. Common standard sizes include 3/8 inch stems, 1/4 inch lug holes, and 4-48 threads. Also verify the movement, bezel, and contact geometry use standard reading conventions, such as 0-100 or 0-15-0 scales. Choose models with clear compliance documentation and certification for easier inspection, machining, and setup.
Frequently Asked Questions
How Do I Calibrate a Dial Indicator Properly?
To calibrate your dial indicator properly, zero it on a certified surface plate, check it against gauge blocks at several points, compare the readings for repeatability, and adjust or service it if it drifts.
Can Dial Indicators Measure Inside Diameters Accurately?
Yes, about 99% of users can get reliable results with the right setup. You can measure inside diameters accurately with a dial indicator and an inside measuring attachment, but you need careful alignment and calibration.
What Causes a Dial Indicator Needle to Stick?
A stuck needle is usually caused by dirt, burrs, a bent stem, worn gears, or a lack of lubrication. Clean and inspect the indicator, then apply a small amount of oil. If it still drags, recalibrate it or have it serviced.
How Often Should Dial Indicators Be Professionally Serviced?
You should have your dial indicators professionally serviced every 12 to 24 months, or sooner if they drift, stick, or get damaged. Think of calibration as a tune-up, it keeps readings crisp and trustworthy.
Are Digital Indicators Better Than Dial Indicators?
Digital indicators are not always better than dial indicators. Digital models offer easier reading and data output, but dial indicators often feel more durable, require no batteries, and suit harsh shop conditions better.