Address
304 North Cardinal
St. Dorchester Center, MA 02124
Work Hours
Monday to Friday: 7AM - 7PM
Weekend: 10AM - 5PM
Address
304 North Cardinal
St. Dorchester Center, MA 02124
Work Hours
Monday to Friday: 7AM - 7PM
Weekend: 10AM - 5PM

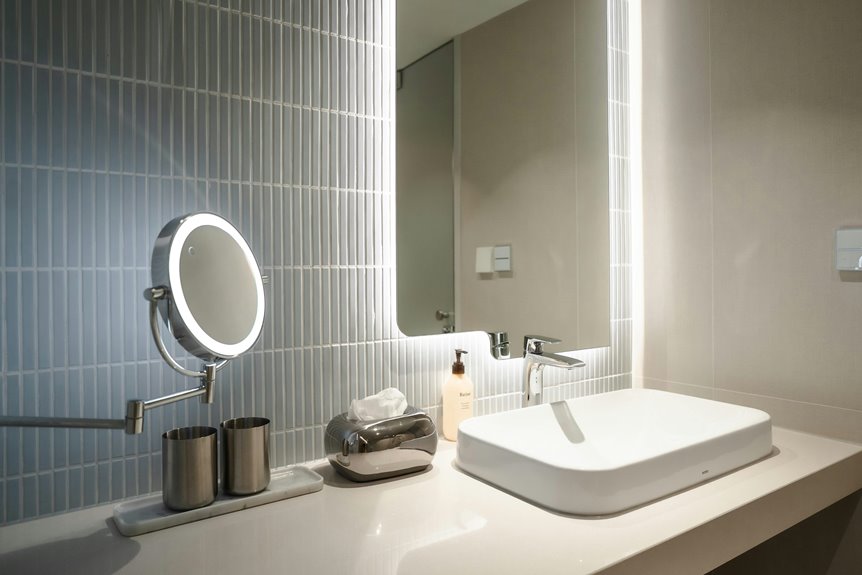
A backlit bathroom mirror can change the whole feel of your space, but only provided you plan it with care. You’ll need the right mirror size, the right LED strip, and a clean way to hide the hardware. Then you’ll set the spacing, mount it safely, and make sure the light glows evenly instead of showing hot spots. Once you see how each choice affects the next one, the rest starts to make sense.
To get a backlit bathroom mirror right, you need the right tools and materials before you touch the wall or the mirror. Start with LED strip lights, a matched power supply, and an aluminum channel with a diffuser for smooth LED diffusion. Then grab wire connectors or a soldering kit, plus scissors, a measuring tape, and a clean cloth. You’ll also want strong adhesive types, like double-sided tape or mounting clips, because moisture can test weak choices fast. Pick LED strips that match your color temperature goal so the glow feels warm or crisp, not odd. As you gather everything, consider mounting safety foremost, especially near glass and water. Once your supplies are ready, the rest feels less stressful, and you’ll work with confidence.
Start measuring your wall space so your mirror fits without crowding the room. Then match the mirror’s proportions to the vanity and nearby fixtures so the whole setup feels balanced and calm.
Once the size works well, your backlit mirror can look built in instead of squeezed in.
With a tape measure in hand, you can save yourself a lot of guesswork later via choosing a mirror that fits the wall and still leaves room for that soft backlit glow. Start by checking your room dimensions, then map the exact spot above the sink. Measure the width, height, and any bumps like outlets, lights, or trim.
Next, note your clearance requirements so the mirror won’t crowd the faucet, medicine cabinet, or door swing. Leave a little breathing room on each side, because tight fits can make the whole setup feel cramped. As you measure, picture how the glow will wrap the wall. That simple step helps you choose a mirror that feels balanced, welcoming, and right at home in your space.
As you narrow down the mirror size, the goal is to make the shape feel like it truly belongs on your wall and not like it was squeezed in at the last minute.
Start through matching the mirror’s aspect ratio to your sink, vanity, and nearby lighting. A tall, slim mirror can calm a tight space, while a wider one can create visual balance above a double sink.
You want enough edge room for the backlit glow to breathe, so avoid sizing it too close to fixtures.
Should your bathroom feels busy, choose a cleaner outline that steadies the room.
Whenever the mirror fits the space naturally, it feels welcoming, like it was always meant to be there, and that makes your bathroom feel more yours.
To get even lighting, you’ll want to map the LED strip before you stick anything down, because a small layout mistake can leave one side bright and the other side dull. Start by tracing the mirror edge and marking a steady line about 2 inches in from the border.
Then notice the corners, curves, and any spots where the strip might need a break so you can keep the glow smooth. This layout helps you build clean edge diffusion, so the light softens instead of showing sharp dots. It also supports thermal management, since you can avoid crowding the strip in tight spots.
Whenever you plan each side with care, you join a setup that feels balanced, calm, and made for your space.
Next, you’ll want to pick LED strips that match your mirror size and give you a soft, even glow without harsh spots.
You’ll also need a power supply that fits the strip voltage, so the lights run safely and stay bright.
For mounting, choose adhesive tape, clips, or a channel system that holds well in a bathroom and keeps the setup neat.
Pick the right LED strip initially, and the whole mirror project gets easier fast. You want a strip that fits your room, so check color temperature first. Soft white feels calm, while cool white looks crisp and bright.
Should you like a modern edge, digital strips can add subtle pixel mapping effects, but simple strips often suit a bathroom best.
Then measure the mirror edge and plan the run before you cut. That way, you stay in control and the glow feels even.
With the right strip, you’re not just wiring lights, you’re joining a smart little DIY crew.
A good backlit mirror starts with the right hardware, because the frame, strip, and power supply all work together. You want hardware styles that fit your mirror weight and your bathroom vibe, so the mount feels solid and looks clean. Pick aluminum clips, low-profile screws, or decorative brackets in case you need extra support and a finished look.
Then match the power supply to your LED strip, usually 12V or 24V, so the lights stay bright and safe. As you plan, leave space for wiring and choose clips that hold the strip near the edge without crushing it.
Should your bathroom feel humid, use rust-resistant parts and secure fasteners. That way, your mirror hangs steady, glows evenly, and feels like it truly belongs.
Carefully measure the mounting area before you attach anything, because this step sets the whole glow in motion. You’re not just marking a wall; you’re building the stage for a mirror that feels like it belongs in your space. Use a placement template to trace the mirror shape, then check clearance guidelines so the frame won’t crowd fixtures or trim.
If your mirror needs a floating look, leave even space around the edges. That small pause in the layout helps the backlight spread evenly and keeps the whole install calm, clean, and ready for the next step.
Before you touch any wires, turn off the power at the breaker so you can work safely and with confidence.
Next, mark the stud locations on the wall, since they’ll help you anchor the mirror securely without guesswork.
Then run the electrical wiring to the right spot, keeping it neat and ready for your backlit setup.
Flip off the breaker initially, and give the wall and wiring a moment to go quiet. You’re not just avoiding a shock; you’re protecting your calm, too. Good safety protocols start here, and they help you feel like part of a careful DIY crew.
Then, test the circuit with a noncontact tester before you touch anything. Should the wires still feel active, stop and check the panel again. This step keeps your bathroom project safe and steady, so you can move forward with confidence.
Once the current’s truly off, you’ve made room for the next part of the job without the nervous buzz.
Find the studs and map the wiring before you hang the mirror, because this step gives your project a solid path from the start. Use a stud finder across the wall, then mark each stud with a pencil so you know where the frame will grip best.
Next, trace any outlet or switch boxes nearby, and keep your marks neat and easy to read. Should you spot a wire route, jot it down clearly and cover the area with electrical tape so you can see what to avoid.
This small step helps you feel in control, and that matters when you’re building something bright for your home. With the wall marked, you and your mirror team can move ahead with confidence and less guesswork.
Now that the wall is marked, you can run the wiring with a clear plan and a lot less stress. You’re not doing this alone; every careful step makes the mirror feel like part of your home.
Next, use circuit labeling so you know which wire feeds the light later. Keep the line away from sharp edges and damp spots, and clamp it firmly to the wall.
In case you’re adding a driver box, mount it where you can reach it easily. That way, your setup stays safe, tidy, and ready for the glow you’ve been building.
Build the spacer frame with care, because this is what gives your backlit mirror that soft floating glow instead of a flat, ordinary edge.
You’ll want a sturdy wood or plywood backing that fits inside the mirror border and holds the gap steady.
Measure twice, then cut clean lines so the frame sits true and feels part of your space.
Leave room for frame ventilation, since a little airflow helps things stay neat in a steamy bathroom.
Should you like a finished look, add decorative insets that match your style without crowding the edge.
Then secure the backing firmly and check that every corner lines up.
Once it feels solid, you’re ready for the lighting step.
With the spacer frame in place, you can start setting the LED strips on the mirror back and turning that empty gap into a soft, even glow. Clean the surface beforehand so the tape grips well and supports adhesive longevity.
Then follow these steps:
As you work, keep the strip flat and smooth so your light looks calm and welcoming. Should you be sharing this project with a partner or friend, this is the fun part where the mirror starts to feel like yours, not just another bathroom fixture. Gentle pressure helps the bond hold strong.
Run the wires carefully so your mirror lights up safely and evenly. You’ll feel better whenever each step stays neat and steady.
Initially, route the strip leads to the power supply, and match the positive and negative terminals exactly. Then use wire management to keep cords flat, tidy, and away from moisture.
Should your outlet setup needs help, choose plug adapters that fit the space without forcing the cable.
Next, join the connections with solid connectors or solder in case you’re comfortable. After that, test the lights before you hide anything, so you can catch a loose link fast.
Keep the wiring relaxed, not tight, and group extra length with clips. That way, your setup looks clean and feels like it belongs there.
Now that the wiring is in place, you can set the mirror on the wall with a lot more confidence. Start at finding the studs, then mark your points so the mirror sits level and steady. Should you need extra support, use anchor bolts for a tight hold.
A solid mount helps you feel like the room was built for you, not just patched together.
Take your time and trust the hardware. Once you secure it well, the mirror feels part of the space, and that gives your bathroom a calm, finished look everyone can enjoy.
Often, the best way to test a backlit bathroom mirror is to step back and look at the whole glow, not just the center. You’ll catch uneven bands faster that way, and you’ll feel more confident about the result.
Move around the room and watch for hot spots, dark corners, or a halo that looks stronger on one side. For spot identification, dim the room lights and study the edges closely.
Then use diffuser testing placing the cover on and off, so you can see how much it softens the LEDs. Should one section look sharper, adjust the strip position and test again.
Small changes matter here, and you’re not being picky, you’re making the mirror feel polished, calm, and welcoming.
Once you’ve checked for bright spots and evened out the glow, sealing the edges gives the mirror its finished, polished look. You’re not just hiding hardware; you’re helping the mirror feel like it belongs in your space.
Use edge sealing to close gaps and soften sharp lines, then add silicone trim for a neat, water-smart border.
Take your time here. A careful finish makes the whole mirror feel intentional, almost custom made.
After the edges look tidy, your backlit mirror feels more inviting, and you get that calm, pulled-together glow you wanted from the start.
Keeping your backlit bathroom mirror clean doesn’t take much, but it does make a big difference in how soft and even the glow feels.
Use routine cleaning with a dry microfiber cloth initially, then wipe the glass with a lightly damp one so you don’t leave streaks.
After that, dry the edges and back area where dust likes to hide.
You can also check the LED channel for grime and clear it gently, since buildup can dull the light.
For humidity prevention, run the fan after showers and keep water from sitting near the frame.
In case you notice loose tape or cloudy spots, fix them promptly so your mirror stays bright and welcoming.
With a few simple habits, you’ll keep that polished look everyone notices.
Yes, you can use a smart switch if your mirror’s driver supports smart control and dimming. Make sure the switch, voltage, and load all match so the setup works properly with app or voice control.
Usually, yes. If you are hardwiring it, you will likely need a permit. Check your local electrical code and hire a licensed electrician so your bathroom project stays compliant, safe, and within local rules.
Yes, backlit mirrors can work with motion sensors. Motion activation or occupancy sensors can save power and light the mirror when you enter the room, turning it on automatically as you approach.
Choose warm white if you want a softer glow and more flattering skin tones, or daylight if you need a brighter, clearer light for tasks. Check the color temperature and beam angle so your mirror feels comfortable, not harsh, and fits your routine.
Usually, no unless you add a battery backup. Low voltage LEDs can keep glowing during an outage, and nearly 60% of households notice lighting gaps in emergencies. That means you can still stay prepared when the lights go out.




