Address
304 North Cardinal
St. Dorchester Center, MA 02124
Work Hours
Monday to Friday: 7AM - 7PM
Weekend: 10AM - 5PM
Address
304 North Cardinal
St. Dorchester Center, MA 02124
Work Hours
Monday to Friday: 7AM - 7PM
Weekend: 10AM - 5PM

You can clean it, repair it, and repurpose it. Whenever you turn a dining room hutch into a bar, pantry, or workspace, you give old furniture a fresh job and save money at the same time. Initially, measure the piece, test the layout with painter’s tape, and clear every surface so you know what fits. Then remove and label hardware, tighten loose joints, and fix chips so doors and drawers open smoothly. After that, choose one clear purpose and shape the inside to match. A bar needs grouped bottles, a mixing zone, and glass storage. A pantry needs labeled baskets, stacked jars, and space for small appliances. A desk needs a sturdy top, cable control, and simple bins for supplies.
Start with a clear plan so your hutch makeover feels exciting instead of overwhelming. You’ll feel more confident when you decide what job it should do before you lift a brush. Perhaps you want it to hold dishes, show off seasonal themes, or create furniture zoning in a small room.
Next, measure the space carefully, then envision how the piece will fit with your daily life. In case you’re using it in a hallway or kitchen, observe the traffic around it. Then choose a style, color, and finish that match the mood you want.
Gather your ideas in one place, so you can compare them without stress. A simple sketch or phone snapshot can help you stay on track and feel like you belong in the process.
Now that you’ve got a plan for your hutch makeover, give the piece a careful cleanup so you can see what you’re really working with. Start by wiping away dust, grease, and old polish with a mild cleaner and a soft cloth. Then dry every surface so moisture doesn’t hide damage.
Next, inspect joints for wobble, cracks, or loose glue, and tighten or clamp what you can. In case drawers stick, clean the runners and sand rough spots lightly. Check the doors, then replace hinges in the event they’re bent, rusty, or sagging.
You’ll also want to fill small dents and patch minor chips so the hutch feels solid again. Whenever you handle repairs at an early stage, you set yourself up for a smoother project and a piece your space can proudly welcome.
The best hutch makeover begins with one honest question: what do you actually need most in your home? Should you need a spot to catch keys, shoes, and mail, turn it into an entry shelf or a mudroom bench.
In case your family needs storage, use it for books, games, or folded blankets. You’ll feel better once the piece matches your daily life, not a trend.
That way, your hutch won’t feel like leftovers. It’ll feel like it belongs, and so will you.
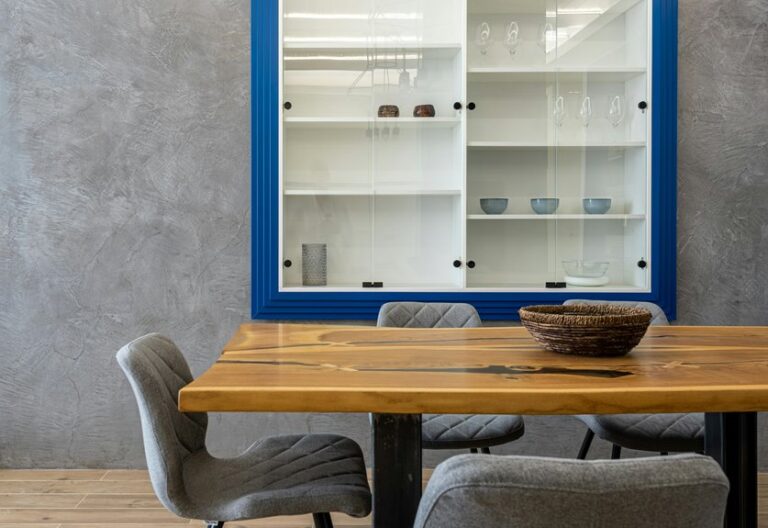
You can turn your hutch into a stylish bar that keeps your glassware close and easy to reach.
Line the shelves with bottles, then set aside a clear spot for your mixing station so you can pour, shake, and serve without crowding the space.
With a few smart touches, your old hutch can feel like a custom bar that fits your home and your routine.
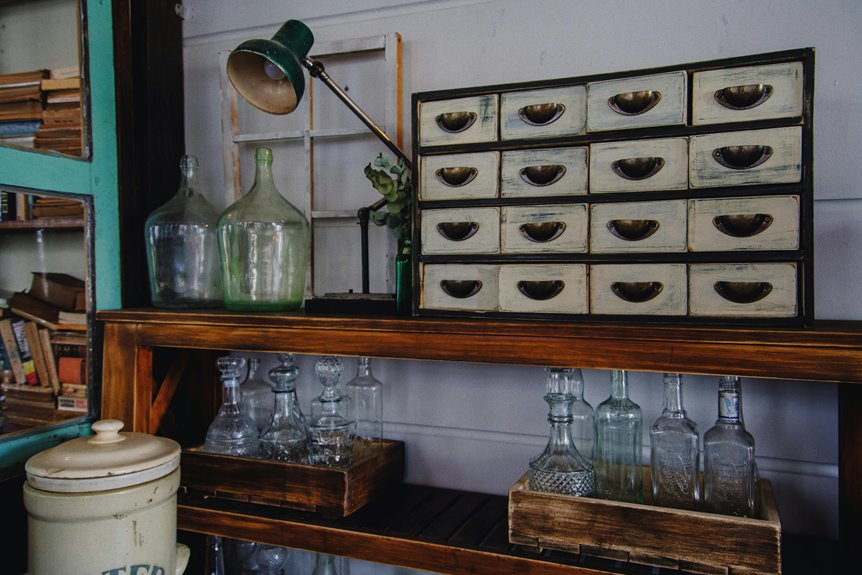
A hutch can turn into a stylish bar cabinet surprisingly well, and it often needs less work than you’d suppose. You can group your stemware organization according to shape, so each glass feels easy to find and safe to reach. Then, tuck in vintage decanters to add charm and a little old-school warmth.
When you arrange glassware this way, your hutch starts to feel like your space, not just furniture. You’ll make guests feel welcome, and you’ll feel ready for easy evenings. Should you share the cabinet, label each zone lightly, and everyone can help keep it neat without fuss.
Now that your glassware has a neat home, bottles can take their place and make the whole hutch feel like a real bar. You can group wine, spirits, and mixers according to height so the shelf looks calm and inviting. Put your favorite antique decanter in front, then tuck special bottles behind it. Should you add LED backlighting, the labels glow and the wood feels warm at night.
| Bottle type | Display mood |
|---|---|
| Wine | relaxed |
| Whiskey | rich |
| Sparkling | festive |
| Liqueur | playful |
| Olive oil | useful |
Keep space between items so each bottle breathes. You’ll feel more at home once the hutch reflects your style, and guests will spot your taste fast. That small glow can make every evening feel shared and easy.
Even a plain hutch can become the busiest spot in your home bar once you turn it into a mixing station. You can keep shaker tins, jiggers, napkins, and glassware close, so your guests feel welcome right away. Should you love a coffee station during morning hours and cocktail prep by night, this setup gives you both in one cozy corner.
Then add a small ice bucket and a cutting board. With a few smart choices, your hutch helps you host with ease and feel like you belong at your own party.
Turn your hutch into storage that feels both useful and beautiful, because this old piece can do far more than sit in a dining room.
You can give each shelf a clear job, so your everyday items stop feeling scattered and start feeling at home. Use baskets, trays, and small boxes to hold mail, linens, or craft supplies, and let concealed compartments keep the clutter out of sight.
Then build in seasonal rotation through swapping out throws, dishes, or holiday pieces as the months change. That way, your hutch stays fresh without extra effort.
In the event you share the space, label each section so everyone knows where things go. You’ll create order, warmth, and a style that feels welcoming, practical, and truly yours.
A hutch can become a display cabinet that feels polished, personal, and full of charm, especially whenever you want your favorite pieces to shine instead of sit concealed away. You can turn each shelf into a mini gallery that welcomes your story and makes guests feel at home.
Start off clearing the surface, then add depth with a painted back, soft lighting, or wallpaper. After that, group your items with care:
Then step back and adjust until it feels like your space, not a showroom.
With a little planning, you can give an old hutch a whole new job as a desk that feels practical and personal.
Start ahead removing shelves that block legroom, then check the height so your chair fits comfortably.
You can keep the top for storage and create a compact workspace below for writing, bills, or remote work.
Add a sturdy desktop insert unless the surface needs support.
Afterwards handle cable management with drilled openings, clips, or a small power strip tucked inside.
Paint or stain the piece to match your room, and use the cabinet doors to hide supplies provided you’re off the clock.
Soon, you’ll have a spot that feels made for you, not borrowed from the corner.
Provided your hutch already works well as a desk, you’re halfway to a craft station that can handle glue, scissors, paper, paint, and all the little bits that somehow multiply overnight. You can turn each shelf into a small home for your making habits, so the room feels calm instead of crowded. Use baskets, jars, and trays for craft supply organization, and keep your most-used tools within reach. Then place a cutting mat, notebook, and charging spot where your project workflow stays smooth.
With this setup, you’ll feel ready to create, even on busy days whenever you need a place that welcomes your ideas.
Should your dining room hutch be sitting there collecting dust, the kitchen can give it a whole new life.
You can turn those shelves into a kitchen pantry that feels easy to use and easy to love.
Store dry goods in jars, keep dishes within reach, and line up baskets for snacks or linens.
Then use the lower section as an appliance hideaway for the toaster, mixer, or coffee maker, so your counters stay calm.
Should your home feel crowded, this swap can make the room feel more like yours.
Add labels, stack items according to height, and leave a little open space so everything breathes.
With a few smart moves, your hutch starts working alongside your routine, and your kitchen feels welcoming every day.
Should your hutch already works hard in the kitchen, paint can give it a fresh new role and a whole new mood. Choose paint selection that fits your room’s light, then test a small spot so you feel sure. Soft whites and moody blues help you feel at home, while warm greens can make the piece join your space like an old friend.
As you paint, work slowly and keep the strokes even. That care shows, and it helps your hutch feel custom, not rushed. Should you desire a cozy, lived-in charm, try a matte finish. In case you prefer easy wipe-downs, pick a gentle sheen.
Old hardware can make your hutch feel stuck in the past, so swap it out for knobs or pulls that match your new style.
Next, add adjustable shelves so you can fit taller dishes, books, or decor without a struggle.
Then finish with new shelf liners, which protect the wood and give each shelf a clean, polished look.
Fresh hardware can instantly pull your hutch out of the past and give it a cleaner, more polished feel. Whenever you swap in antique pulls or custom knobs, you help the piece match your style and feel like it belongs in your home, not a forgotten corner. Choose finishes that echo your room, then tighten each piece so it feels solid and ready for daily use.
This small change can make your hutch feel more welcoming, and that matters whenever you want your space to feel shared, warm, and truly yours.
Once you’ve updated the hardware, adjustable shelves can make your hutch work even harder for you.
You can turn one tall cabinet into a friendlier spot for dishes, books, or display pieces. Start through checking the side walls for peg holes, then add adjustable brackets that fit snugly. Move each shelf until the space feels right for your items, so nothing looks cramped or lonely.
In case you share the hutch with family, this flexibility helps everyone claim a spot for their own things. You can also raise a shelf for taller pitchers or lower one for stacks of plates.
Small changes like these make the piece feel custom, and they help your hutch fit your home, your routine, and your style with ease.
New shelf liners can give your hutch a cleaner, calmer look while also making every shelf easier to use. You’ll feel more at home whenever the inside looks neat and cared for. Start with a cork sheet provided you want quiet grip under dishes. Choose antibacterial liners for kitchen use, especially in case you store cups, snacks, or linens. Then cut each liner to fit, smoothing out bubbles as you go.
As you update the hardware and shelving, these small touches help your hutch feel like it belongs in your space.
Styling your repurposed hutch is where it really starts to feel like yours, so don’t rush this part. Start with a few larger pieces, then tuck smaller items around them so the shelves feel steady, not crowded. Use seasonal vignettes to keep the look fresh, and switch them out as your mood changes.
Textured backdrops, like wallpaper, beadboard, or wood planks, help every object stand out and feel more finished. Next, repeat a color or shape on different shelves so the whole piece feels connected. Add greenery, woven baskets, books, and a favorite dish to bring warmth and a sense of home.
Whenever you style it with care, your hutch doesn’t just hold things. It welcomes you in and makes your room feel like part of the group.
Should you want your hutch to feel warm and inviting, lighting is the detail that pulls it all together. You can tuck LED strips along the shelves to wash your display in a soft glow, and you can use Accent sconces nearby to make the whole piece feel like it belongs in the room.
That little light helps your hutch welcome people in, even while the rest of the space stays quiet.
Whenever you pair light with simple decor, your hutch feels personal, settled, and ready for everyday life.
One of the easiest ways to avoid regret is to slow down before you start cutting, painting, or moving pieces around. Before you touch the hutch, measure twice and check the room, the doors, and the shelves you want to keep. That simple habit saves you from awkward fits and wobbly results.
Next, test your plan on paper or with painter’s tape, because prototype fails can happen whenever an idea looks great in your head but clashes with real life. Also, remove hardware carefully, label each part, and save anything you might reuse later. Should you be sharing this piece with your home, consider how it’ll feel in the space so the final result fits your style and your everyday rhythm.
Scout thrift shops, curbside giveaways, neighborhood auctions, and estate sales for an inexpensive hutch. These places often turn up solid pieces with character, and you can repurpose one without paying much.
Yes, you can repurpose just the hutch top as wall mounted shelving or an entryway console. It adds practical storage and a distinctive look that fits naturally into your space.
For unusual spaces, a hallway works well for entryway storage, a bedroom can hold blankets, and a guest room suits extra pieces. It can also serve as a home office organizer or laundry room cabinet.
Yes, take off the glass doors first; you will paint more efficiently and with less risk. Sand down the old paint, shield any stained glass, and remove the hinges with care. If you leave glass shelving in place, cover it with tape so the sandblasted finish stays neat.
Add matte hardware, replace ornate details with crisp lines, and pair the hutch with wallpaper or wood planks for layered texture. The result feels current, polished, and tailored to your space.