Address
304 North Cardinal
St. Dorchester Center, MA 02124
Work Hours
Monday to Friday: 7AM - 7PM
Weekend: 10AM - 5PM
Address
304 North Cardinal
St. Dorchester Center, MA 02124
Work Hours
Monday to Friday: 7AM - 7PM
Weekend: 10AM - 5PM

Installing a patio on a slope takes patience, but you can handle it with a clear plan and the right base work. You’ll start checking how water moves, then shape the site so the patio stays steady and dry. After that, you’ll dig, build support where the slope calls for it, and set the pavers so they lock in place. Get the prep right now, and the rest gets much easier.
Before you dig a single shovel of soil, take time to map out the patio so the slope works with you, not against you. Walk the space and notice where water naturally moves after rain. Mark the outline with stakes or rope, then check that the shape stays square. Add a little extra room for edging and for furniture placement, so chairs don’t feel crowded later.
Should the yard drop sharply, plan for grade shifts that feel smooth, not abrupt. You’ll also want to protect trees, roots, and any low spot that could need help with drainage. Once you plan carefully now, the rest of the project feels less stressful, and you’ll build a patio that fits your yard like it belongs there.
Round up your tools and materials now, and you’ll save yourself a lot of back-and-forth once the digging starts. You’ll want gloves, eye protection, a shovel, a sturdy rake, a tamper or plate compactor, a level, string, stakes, and a saw for clean cuts. For safety, keep boots and a dust mask close at hand.
Next, gather gravel, bedding sand, pavers, edging, and polymeric sand, then check that each load fits your patio size. Good material sourcing helps you avoid delays and weird color mismatches that can make a project feel patchy.
Before you begin, give your tools a quick tool maintenance check. Tighten loose handles, clean muddy blades, and make sure the compactor runs well. Once everything’s ready, you’ll feel more confident and a lot less rushed.
Start near choosing the patio outline that fits your slope and the way you want to use the space. Then set corner stakes at each point, so you can see the shape clearly before you dig.
After that, mark the level boundaries with paint, rope, or a hose, and keep the lines square so the patio stays neat and steady.
A clear patio outline makes the whole slope job feel much less stressful, because it shows you exactly where the finished space will sit.
Start tracing the shape with rope or garden hose, then step back and check how it fits your yard. You want the patio to feel like it belongs, not like it landed there unintentionally.
Leave room for a planting buffer so the edges blend into the slope, and plan for privacy screening should you want the space to feel tucked away.
Keep the outline clean and easy to read, and make sure it follows the area you’ll use most. Small changes now can save you from awkward corners later, and that makes the whole project feel calmer.
Now that you’ve got the patio outline in place, you can lock it in with corner stakes so the shape stays clear while you work on the slope. Drive one stake at each corner, then stretch string or rope between them to match your outline.
Check stake alignment from different angles so each side stays true and your patio feels like it belongs in the yard, not like it wandered off on its own. Keep the stakes firm in the soil for corner stability, especially where the ground feels loose or uneven. Should a stake leans, reset it right away. You’ll save yourself stress later, and your layout will stay easy to trust as you move into the next steps.
Tape, string, and a clear eye will help you turn those stakes into a real patio shape on the slope. Start pulling string taut between the corner stakes, then check stake alignment so each edge matches your plan.
Walk the outline and trace a painted perimeter with marking paint or a hose. That line shows where the patio will sit and where you’ll leave edging space. Keep the shape square using the 3-4-5 method, and measure 6 inches beyond the layout so you have room to work.
When the shape feels right, step back and look at it from uphill and downhill. Should it read cleanly from both sides, you’re ready for the next step.
Dig into the patio area with care, because this step sets the tone for the whole project. Before you start, call for utility locating and check soil testing so you know what’s below and how the ground will behave. Then strip away grass, roots, and loose debris. As you dig, keep the floor even and follow the planned fall away from the house.
| Check | Goal |
|---|---|
| Depth | Reach about 8 inches |
| Slope | Keep drainage moving |
| Soil | Remove soft spots |
| Edge | Leave extra room |
| Feel | Create a clean base |
You’re building a spot where your crew can relax, so take your time and stay steady. Use a level often, and don’t chase perfect dirt, just a stable, friendly shape for the next step.
At the time your slope is too steep for a simple base, you can use retaining walls or steps to create stable levels that make the patio safer and easier to build.
Place each wall or step where it matches the natural grade, and plan the layout so the patio feels smooth instead of awkward.
Behind every wall, add drainage space so water can move away and won’t push against your new structure.
Should the slope feels too sharp to trust, a small retaining wall or a set of steps can make the whole patio plan much easier to control. You’ll place the wall where it can hold back soil without fighting the yard’s natural flow. Check load bearing needs first, because the wall must support the patio edge and stay steady over time. Add frost protection below the base so cold weather won’t push it out of line.
When you plan the wall well, you create a calmer work area and a patio that feels like it belongs on your land.
Now that the wall can hold the uphill side in place, you can choose how the patio should step down the slope. You can build stepped terraces for broad, usable landings that feel calm and open.
Should you want a lighter look, staggered platforms break the grade into smaller levels and keep each section easy to reach. Use each step to match the yard’s natural rise, so the patio feels like it belongs there.
Keep the rise even from one level to the next, and make every tread wide enough for safe walking and furniture. You can also mix walls with steps near seating spots, which helps the space feel welcoming.
Once you plan the layout carefully, the slope starts working for you, not against you.
When you handle drainage this way, your slope feels solid, your work lasts longer, and you stay part of a patio space that stays dry, steady, and welcoming.
With the slope in mind, start your patio drainage plan before you set a single paver. You want water to move away, not pool where you’ll relax with friends.
Shape the ground so it falls from the house, and mark any low spots beforehand. A french drain can catch runoff along the edge, while rain gardens help soak up extra water in a nearby planting bed.
Should you see a hard downhill flow, guide it to a safe exit point with swales or a small drain outlet. Keep drain lines clear of your patio layout, so they don’t get crushed later.
As you plan this now, you make the whole space feel safer, drier, and easier to enjoy all season.
Once the drainage plan is set, you can start building a base that will hold the patio steady for years. Initially, check soil testing results so you know whether the ground needs extra support or drainage help.
Then spread gravel in thin lifts, wet each layer, and compact it hard so it locks together. This matters because a loose base can shift, and frost heave can lift your patio whenever temperatures drop.
Use a plate compactor and a level to keep the surface firm and even. You’re not just making a foundation, you’re creating a solid spot where your patio can feel like it truly belongs.
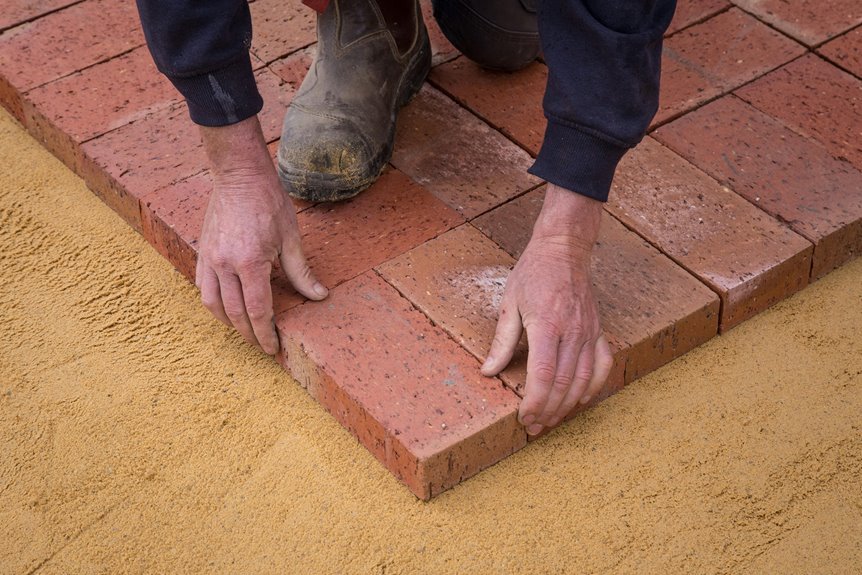
Now you can start setting the patio pieces, and this is where your careful prep really pays off.
Begin at your fixed reference point and follow the pattern layout you planned, so each stone stays true as you move across the slope.
Keep the initial row tight, then check each piece for level and spacing.
Should you chose a bold color selection, mix pieces from a few stacks as you go, and that helps the patio feel balanced and natural.
Press each paver into the sand with steady, gentle taps, not wild hammer drama.
Stay aware of the slope line, and keep the surface even from piece to piece.
Work slowly, because the right fit now makes the whole space feel welcoming, sturdy, and ready for shared time.
As the last stones settle into place, you can start shaping the patio’s clean outer line. Use edge trimming to cut any pavers that hang past the mark, and keep each cut snug so the layout feels finished, not forced. Then set your border pieces with border anchoring so the edge holds firm on the slope.
Work from one end to the other, and keep your pace steady. Whenever you take your time here, your patio looks polished and feels like it belongs in your yard.
Sweep polymeric sand into the joints and let it settle deep between the pavers, because this is what helps the patio act like one solid surface instead of a loose puzzle. You’re almost there, and this step gives your work a calm, finished feel. Brush the sand across every seam, then tap the pavers lightly so the gaps pack tight. Keep the edge restraints firm, since they hold the pattern in place on a slope.
| Step | Why it matters |
|---|---|
| Sweep in sand | Fills gaps fully |
| Compact gently | Helps joints lock |
| Check edges | Stops sideways movement |
After that, add a little more sand where it sinks. Whenever the joints stay full, your patio feels steady underfoot, and you can enjoy the space with confidence.
Once the joints have set, you should sweep away every bit of loose sand and dust so the patio looks neat and stays stable.
Then you can apply a protective sealer to help guard the surface from stains, water, and weather wear. This last step gives your sloped patio a cleaner finish and a little extra staying power.
A good final sweep makes your patio look finished and helps protect the surface, so take a few careful minutes to clean it up.
Start with leaf sweeping, then check the joints for loose grit, weed removal, and tiny chips that might’ve landed after install.
You want every paver to feel part of the same space, and a clean surface helps that happen.
After that, walk the patio slowly and brush away any dust in corners.
In case you spot stubborn dirt, lift it gently rather than scrubbing hard.
That way, your patio stays neat, welcoming, and ready for everyday use with your crew.
Now give your patio the last bit of care it needs through applying a protective sealer after the surface is fully clean and dry. You’ll help your pavers hold up better against stains, moisture, and daily wear. Start choosing a sealer made for your patio material and slope conditions. Then use a roller or sprayer to spread a thin, even coat. Work in small sections so you don’t miss corners or joints. Let the sealer soak in, and wipe away any puddles before they harden.
This step also adds weather protection and improves UV resistance, so your patio keeps its color and strength longer. Once it cures, you can enjoy a space that feels polished, cared for, and ready for every gathering.
Calculate the patio slope by using a 1:12 ramp gradient: for every 1 inch of height change, provide 12 inches of horizontal distance. Make the threshold transition smooth, and verify local accessibility codes for the exact requirements.
You will usually need zoning approval, and if your hillside requires retaining walls or major grading, a geotechnical report may be required. Ask your local building department which permits apply so nothing is overlooked.
You can stop erosion by building a retaining wall along the patio edge and adding a French drain to redirect water away. Pack the soil firmly, install paver edging, and add low growing groundcover to help hold the perimeter in place.
Yes, you can place lighting under pavers on a slope if you shield the fixtures properly. Use LED channels and a drainage conduit to keep the patio dry, secure, and well lit.
Keep it safe by managing freeze protection and drainage: clear snow promptly, keep joints filled, inspect runoff on the slope, and stop water from pooling. This helps protect the patio’s fit, keeps it sturdy, and preserves its welcoming look.